Windows 10 has a lot of hidden features and tweaks that really do miracles on PC performance and keep your system as good as new for years. Most of the time we utilize third-party software to scan and keep the PC clean however there are computer geeks who do it all manually.
But not everybody knows about the windows 10 performance tweaks to boost speed. Registries are the ledger of settings that records our selection and setting preferences that we choose for every application on our computer. You can change Windows design, unlock hidden features, or improve Windows interface and performance for a better experience. Let’s quickly run down to the most effective Windows 10 registry tweaks.
How to Access Windows Registry?
Before we go ahead with the Windows 10 registry tweaks, let us learn how to access Windows Registry. There are multiple ways to access Windows Registry.
- Press Win + R key combination and type ‘Regedit’ in the Run Command window.
- Type ‘Regedit’ in the search box on the taskbar and click on the ‘Registry Editor App’ option.
- Right-click on the ‘Start’ button and click on the ‘Run’ option. Type ‘Regedit’ and hit the ‘Enter’ key.
You must have Administrator privileges to get into Windows Registry. On user account control prompt, click on the ‘Yes’ option.
“Please Note: Registry tweak is a sensitive part of Windows and requires expertise. It is recommended to take a backup of the registry before making any changes. If the steps are not followed carefully, the system may end up into a no-boot situation.”
Disable Windows Startup Delay
Whenever you disable any startup item, it still lives in the startup tray but denies to load up during the startup. If you experience a delay in Windows startup, you can make use of this registry tweak. Microsoft has by default configured to delay the apps to start with Windows. Disabling this will decrease the booting time and it will assist you to optimize windows 10 performance effectively.
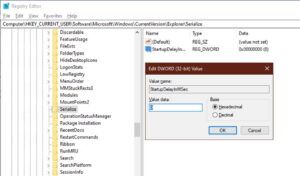
Open the registry editor and expand this address. You can copy and paste this in the address bar.
Computer\HKEY_CURRENT_USER\Software\Microsoft\Windows\CurrentVersion\Explorer
Expand the folder called ‘Serialize’. If you can’t find it there, right-click on the ‘Explorer’ folder and click on ‘New’ and select ‘Key’. It will create a new folder with the name of ‘New Key#1’. Right-click on it and rename the folder as ‘Serialize’.
Right-click on the new folder ‘Serialize’ and follow ‘New’ and select ‘Dword’. You will need to rename the new ‘Dword key’ to ‘StartupDelayInMSec’ and press enter. Now you need to double-click on the same and change the value to numerical 0 (Zero). And you are all set!
Clear Windows Page File
Windows operating system creates a page file that acts as a Virtual Memory on your hard disk when your system runs out of physical RAM. The size of virtual memory is set thrice the size of your physical RAM. It consumes a lot of space on your hard drive. With this tweak, on every shutdown, the system can automatically clean the page file and free up that precious space. Clearing page file is another windows 10 performance tweaks that can save your PC from lagging.
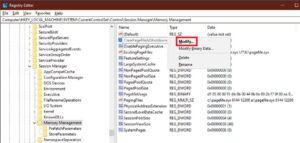
Open the registry editor and expand this address. You can copy and paste this in the address bar.
Computer\HKEY_LOCAL_MACHINE\SYSTEM\CurrentControlSet\Control\Session Manager\Memory Management.
In the right-hand side panel, right-click on ClearPageFileAtShutDown.
Click on the ‘Modify’ option and change the value to 1. And it’s done!
Disable Windows 10 Lock Screen
The lock screen is an added security measure on Windows PC that ask for a password every time you unlock your computer. If you feel that you are already in a secured environment and don’t want this additional security, you can turn off the lock screen to optimize windows 10 performance.
Open the registry editor and expand this address. You can copy and paste this in the address bar.
Computer\HKEY_LOCAL_MACHINE\SOFTWARE\Policies\Microsoft\Windows
Right-click on ‘Windows’ folder and click on ‘New’ followed by ‘Key’.
Rename the folder with the name ‘Personalization’ and click on ‘New’ followed by ‘DWORD (32-bit) Value’.
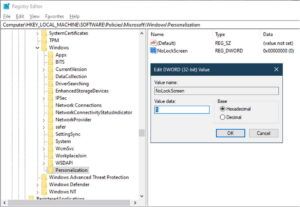
Rename the new Dword key with the name of ‘NoLockScreen’ and press Enter.
Double click on the key and change the value to 1 to enable No Lock Screen.
Open Last Active Window in Taskbar
This setting was introduced with Windows 7 wherein you can use personalized icons of applications in the taskbar. As you hover the mouse over an icon, it shows a thumbnail of the active instance. If are regular on a few applications and use then every now and then, you can tweak this setting to open the last active instance of that application. This will save you time to practice opening the same application over and over again.
Open the registry editor and expand this address. You can copy and paste this in the address bar.
Computer\HKEY_CURRENT_USER\SOFTWARE\Microsoft\Windows\CurrentVersion\Explorer\Advanced
Right-click on the empty space in the right-hand side panel and click on ‘New’ followed by ‘DWORD (32-bit) Value’.
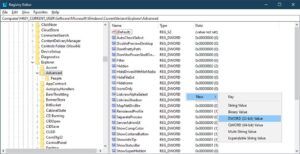
Rename the new key as ‘LastActiveClick’ and hit enter.
Right-click on the new entry that you just created and click on ‘Modify’ to change the ‘Value Data’ as 1 to enable the last active window in the taskbar.
Add Favorite Apps and Options to the Context Menu
Windows Context Menu is one of the quickest approachable space that you can reach anytime you want. When you right-click on the blank space of the desktop screen (Wallpaper) the menu that appears is known as the Context Menu. You can add your favourite Apps or Windows options to this menu and access then just with the right-click. Here is an example of adding the ‘Check for Windows Updates’ option in the Context Menu.
Open the registry editor and expand this address. You can copy and paste this in the address bar.
Computer\HKEY_CLASSES_ROOT\DesktopBackground\Shell
Right-click on the ‘Shell’ folder and click on ‘New’ followed by ‘Key.’ A new sub-folder will appear.
Rename the folder as ‘Check for Updates’ and press enter. The name that you will enter here will appear in the Windows Context Menu.
Now right-click on the ‘Check for Updates’ folder and click on ‘New’ followed by ‘Key.’ Another sub-folder will be created. Rename this with the name of ‘Command’ and press enter.
Once we create these keys, now it’s time to direct them to the required option that we are looking forward to adding.
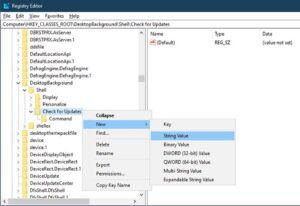
Select ‘Check for Updates’ folder and right-click on it, click on ‘New’ followed by ‘String Value’.
Rename the String Value as ‘SettingsURI’ and press enter.
Double-click on the ‘SettingsURI’ to open the ‘Edit Value’ window.
Enter ‘ms-settings:windowsupdate-action’ (Without commas) in the Value Data field and press enter.
Select the ‘Command’ folder and right-click on it, click on ‘New’ followed by ‘String Value’.
Rename the String Value as ‘DelegateExecute’ and press enter.
Double-click on the ‘DelegateExecute’ to open the ‘Edit Value’ window.
Enter {556FF0D6-A1EE-49E5-9FA4-90AE116AD744} (With Brackets) in the Value Data field and press enter.
Now is the time to add a little icon in front of ‘Check for Updates’ command.
Select ‘Check for Updates’ folder and right-click on it, click on ‘New’ followed by ‘String Value’.
Rename the String Value as ‘Icon’ and press enter.
Double-click on the ‘Icon’ to open the ‘Edit Value’ window.
Enter ‘%SystemRoot%\System32\shell32.dll,-47’ (Without commas) in the Value Data field and press enter.
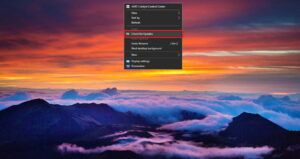
You should see the new command added to your Context Menu. If you don’t see it, you may need to restart the computer to get it active.
Summing Up
There is a lot more interesting to do. Try out these Windows 10 registry tweaks to improve performance and you’ll find drastic change in the PC boot time and loading system settings. You can also make use of third-party software to boost PC performance however these registry tweaks for Windows 10 are more effective.
Disclosure: The articles, guides and reviews on BlowSEO covering topics like SEO, digital marketing, technology, business, finance, streaming sites, travel and more are created by experienced professionals, marketers, developers and finance experts. Our goal is to provide helpful, in-depth, and well-researched content to our readers. You can learn more about our writers and the process we follow to create quality content by visiting our About Us and Content Creation Methodology pages.
